OpenGL – EGL

什么是 EGL

EGL 是 OpenGL ES 和本地窗口系统(Native Window System)之间的通信接口,它的主要作用:

  • 与设备的原生窗口系统通信;
  • 查询绘图表面的可用类型和配置;
  • 创建绘图表面;
  • 在OpenGL ES 和其他图形渲染API之间同步渲染;
  • 管理纹理贴图等渲染资源。

OpenGL ES 的平台无关性正是借助 EGL 实现的,EGL 屏蔽了不同平台的差异(Apple 提供了自己的 EGL API 的 iOS 实现,自称 EAGL)

本地窗口相关的 API 提供了访问本地窗口系统的接口,而 EGL 可以创建渲染表面 EGLSurface ,同时提供了图形渲染上下文 EGLContext,用来进行状态管理,接下来 OpenGL ES 就可以在这个渲染表面上绘制。

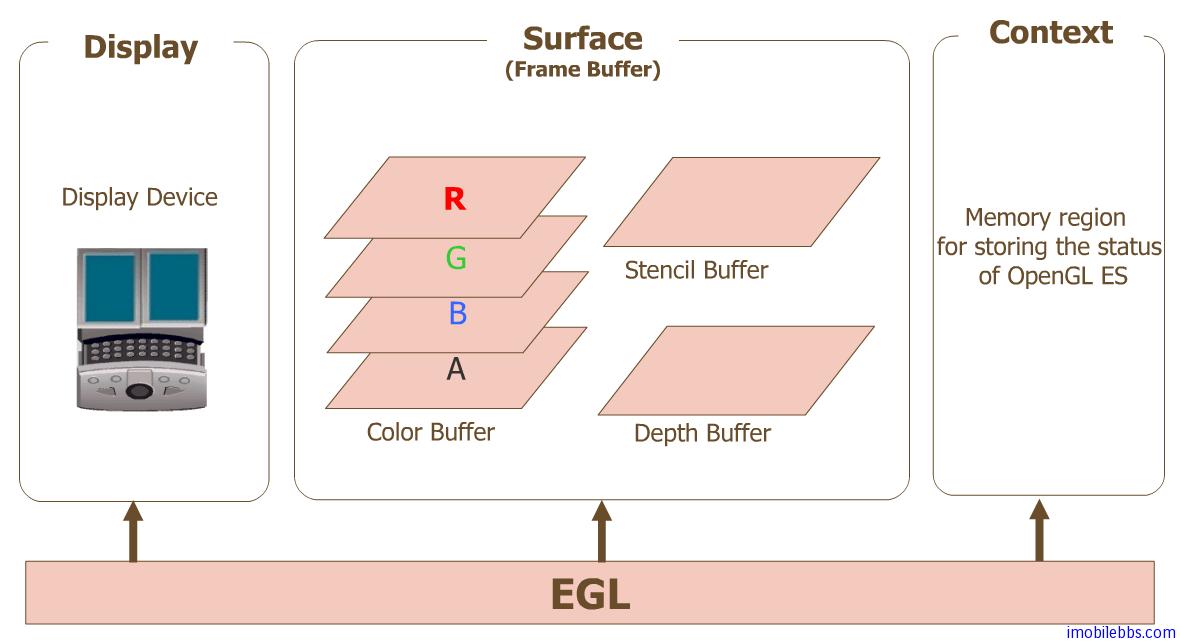
img

egl、opengles 和设备之间的关系

图片中:

  • Display(EGLDisplay) 是对实际显示设备的抽象;
  • Surface(EGLSurface)是对用来存储图像的内存区域 FrameBuffer 的抽象,包括 Color Buffer(颜色缓冲区), Stencil Buffer(模板缓冲区) ,Depth Buffer(深度缓冲区);
  • Context (EGLContext) 存储 OpenGL ES 绘图的一些状态信息;

在 Android 平台上开发 OpenGL ES 应用时,类 GLSurfaceView 已经为我们提供了对 Display , Surface , Context 的管理,即 GLSurfaceView 内部实现了对 EGL 的封装,可以很方便地利用接口 GLSurfaceView.Renderer 的实现,使用 OpenGL ES API 进行渲染绘制,很大程度上提升了 OpenGLES 开发的便利性。

当然我们也可以自己实现对 EGL 的封装,本文就是在 Native 层对 EGL 进行封装,不借助于 GLSurfaceView ,实现图片后台渲染,利用 GPU 完成对图像的高效处理。

EGL 的应用

使用 EGL 渲染的一般步骤:

  • 获取 EGLDisplay 对象,建立与本地窗口系统的连接
    调用 eglGetDisplay 方法得到 EGLDisplay。
  • 初始化 EGL 方法
    打开连接之后,调用 eglInitialize 方法初始化。
  • 获取 EGLConfig 对象,确定渲染表面的配置信息
    调用 eglChooseConfig 方法得到 EGLConfig。
  • 创建渲染表面 EGLSurface
    通过 EGLDisplay 和 EGLConfig ,调用 eglCreateWindowSurface 或 eglCreatePbufferSurface 方法创建渲染表面,得到 EGLSurface,其中 eglCreateWindowSurface 用于创建屏幕上渲染区域,eglCreatePbufferSurface 用于创建屏幕外渲染区域。
  • 创建渲染上下文 EGLContext
    通过 EGLDisplay 和 EGLConfig ,调用 eglCreateContext 方法创建渲染上下文,得到 EGLContext。
  • 绑定上下文
    通过 eglMakeCurrent 方法将 EGLSurface、EGLContext、EGLDisplay 三者绑定,绑定成功之后 OpenGLES 环境就创建好了,接下来便可以进行渲染。
  • 交换缓冲
    OpenGLES 绘制结束后,使用 eglSwapBuffers 方法交换前后缓冲,将绘制内容显示到屏幕上,而屏幕外的渲染不需要调用此方法。
  • 释放 EGL 环境
    绘制结束后,不再需要使用 EGL 时,需要取消 eglMakeCurrent 的绑定,销毁 EGLDisplay、EGLSurface、EGLContext 三个对象。

代码实现:

// 创建 GLES 环境
int BgRender::CreateGlesEnv()
{
    // EGL config attributes
    const EGLint confAttr[] =
    {
            EGL_RENDERABLE_TYPE, EGL_OPENGL_ES3_BIT_KHR,
            EGL_SURFACE_TYPE,EGL_PBUFFER_BIT,//EGL_WINDOW_BIT EGL_PBUFFER_BIT we will create a pixelbuffer surface
            EGL_RED_SIZE,   8,
            EGL_GREEN_SIZE, 8,
            EGL_BLUE_SIZE,  8,
            EGL_ALPHA_SIZE, 8,// if you need the alpha channel
            EGL_DEPTH_SIZE, 8,// if you need the depth buffer
            EGL_STENCIL_SIZE,8,
            EGL_NONE
    };

    // EGL context attributes
    const EGLint ctxAttr[] = {
            EGL_CONTEXT_CLIENT_VERSION, 2,
            EGL_NONE
    };

    // surface attributes
    // the surface size is set to the input frame size
    const EGLint surfaceAttr[] = {
            EGL_WIDTH, 1,
            EGL_HEIGHT,1,
            EGL_NONE
    };
    EGLint eglMajVers, eglMinVers;
    EGLint numConfigs;

    int resultCode = 0;
    do
    {
        //1. 获取 EGLDisplay 对象,建立与本地窗口系统的连接
        m_eglDisplay = eglGetDisplay(EGL_DEFAULT_DISPLAY);
        if(m_eglDisplay == EGL_NO_DISPLAY)
        {
            //Unable to open connection to local windowing system
            LOGCATE("BgRender::CreateGlesEnv Unable to open connection to local windowing system");
            resultCode = -1;
            break;
        }

        //2. 初始化 EGL 方法
        if(!eglInitialize(m_eglDisplay, &eglMajVers, &eglMinVers))
        {
            // Unable to initialize EGL. Handle and recover
            LOGCATE("BgRender::CreateGlesEnv Unable to initialize EGL");
            resultCode = -1;
            break;
        }

        LOGCATE("BgRender::CreateGlesEnv EGL init with version %d.%d", eglMajVers, eglMinVers);

        //3. 获取 EGLConfig 对象,确定渲染表面的配置信息
        if(!eglChooseConfig(m_eglDisplay, confAttr, &m_eglConf, 1, &numConfigs))
        {
            LOGCATE("BgRender::CreateGlesEnv some config is wrong");
            resultCode = -1;
            break;
        }

        //4. 创建渲染表面 EGLSurface, 使用 eglCreatePbufferSurface 创建屏幕外渲染区域
        m_eglSurface = eglCreatePbufferSurface(m_eglDisplay, m_eglConf, surfaceAttr);
        if(m_eglSurface == EGL_NO_SURFACE)
        {
            switch(eglGetError())
            {
                case EGL_BAD_ALLOC:
                    // Not enough resources available. Handle and recover
                    LOGCATE("BgRender::CreateGlesEnv Not enough resources available");
                    break;
                case EGL_BAD_CONFIG:
                    // Verify that provided EGLConfig is valid
                    LOGCATE("BgRender::CreateGlesEnv provided EGLConfig is invalid");
                    break;
                case EGL_BAD_PARAMETER:
                    // Verify that the EGL_WIDTH and EGL_HEIGHT are
                    // non-negative values
                    LOGCATE("BgRender::CreateGlesEnv provided EGL_WIDTH and EGL_HEIGHT is invalid");
                    break;
                case EGL_BAD_MATCH:
                    // Check window and EGLConfig attributes to determine
                    // compatibility and pbuffer-texture parameters
                    LOGCATE("BgRender::CreateGlesEnv Check window and EGLConfig attributes");
                    break;
            }
        }

        //5. 创建渲染上下文 EGLContext
        m_eglCtx = eglCreateContext(m_eglDisplay, m_eglConf, EGL_NO_CONTEXT, ctxAttr);
        if(m_eglCtx == EGL_NO_CONTEXT)
        {
            EGLint error = eglGetError();
            if(error == EGL_BAD_CONFIG)
            {
                // Handle error and recover
                LOGCATE("BgRender::CreateGlesEnv EGL_BAD_CONFIG");
                resultCode = -1;
                break;
            }
        }

        //6. 绑定上下文
        if(!eglMakeCurrent(m_eglDisplay, m_eglSurface, m_eglSurface, m_eglCtx))
        {
            LOGCATE("BgRender::CreateGlesEnv MakeCurrent failed");
            resultCode = -1;
            break;
        }
        LOGCATE("BgRender::CreateGlesEnv initialize success!");
    }
    while (false);

    if (resultCode != 0)
    {
        LOGCATE("BgRender::CreateGlesEnv fail");
    }

    return resultCode;
}

//渲染
void BgRender::Draw()
{
    LOGCATE("BgRender::Draw");
    if (m_ProgramObj == GL_NONE) return;
    glViewport(0, 0, m_RenderImage.width, m_RenderImage.height);

    // Do FBO off screen rendering
    glUseProgram(m_ProgramObj);
    glBindFramebuffer(GL_FRAMEBUFFER, m_FboId);

    glBindVertexArray(m_VaoIds[0]);
    glActiveTexture(GL_TEXTURE0);
    glBindTexture(GL_TEXTURE_2D, m_ImageTextureId);
    glUniform1i(m_SamplerLoc, 0);

    if (m_TexSizeLoc != GL_NONE) {
        GLfloat size[2];
        size[0] = m_RenderImage.width;
        size[1] = m_RenderImage.height;
        glUniform2fv(m_TexSizeLoc, 1, &size[0]);
    }

    //7. 渲染
    GO_CHECK_GL_ERROR();
    glDrawElements(GL_TRIANGLES, 6, GL_UNSIGNED_SHORT, (const void *)0);
    GO_CHECK_GL_ERROR();
    glBindVertexArray(GL_NONE);
    glBindTexture(GL_TEXTURE_2D, GL_NONE);

    //一旦解绑 FBO 后面就不能调用 readPixels
    //glBindFramebuffer(GL_FRAMEBUFFER, GL_NONE);

}

//释放 GLES 环境
void BgRender::DestroyGlesEnv()
{
    //8. 释放 EGL 环境
    if (m_eglDisplay != EGL_NO_DISPLAY) {
        eglMakeCurrent(m_eglDisplay, EGL_NO_SURFACE, EGL_NO_SURFACE, EGL_NO_CONTEXT);
        eglDestroyContext(m_eglDisplay, m_eglCtx);
        eglDestroySurface(m_eglDisplay, m_eglSurface);
        eglReleaseThread();
        eglTerminate(m_eglDisplay);
    }

    m_eglDisplay = EGL_NO_DISPLAY;
    m_eglSurface = EGL_NO_SURFACE;
    m_eglCtx = EGL_NO_CONTEXT;

}

Java 层的代码,主要是一个 ImageView 用于展示渲染前后的图像。

// 创建渲染对象
NativeBgRender mBgRender = new NativeBgRender();
// 初始化创建 GLES 环境
mBgRender.native_BgRenderInit();
// 加载图片数据到纹理
loadRGBAImage(R.drawable.java, mBgRender);
// 离屏渲染
mBgRender.native_BgRenderDraw();
// 从缓冲区读出渲染后的图像数据,加载到 ImageView
mImageView.setImageBitmap(createBitmapFromGLSurface(0, 0, 421, 586));
// 释放 GLES 环境
mBgRender.native_BgRenderUnInit();

private void loadRGBAImage(int resId, NativeBgRender render) {
    InputStream is = this.getResources().openRawResource(resId);
    Bitmap bitmap;
    try {
        bitmap = BitmapFactory.decodeStream(is);
        if (bitmap != null) {
            int bytes = bitmap.getByteCount();
            ByteBuffer buf = ByteBuffer.allocate(bytes);
            bitmap.copyPixelsToBuffer(buf);
            byte[] byteArray = buf.array();
            render.native_BgRenderSetImageData(byteArray, bitmap.getWidth(), bitmap.getHeight());
        }
    }
    finally
    {
        try
        {
            is.close();
        }
        catch(IOException e)
        {
            e.printStackTrace();
        }
    }
}

private Bitmap createBitmapFromGLSurface(int x, int y, int w, int h) {
    int bitmapBuffer[] = new int[w * h];
    int bitmapSource[] = new int[w * h];
    IntBuffer intBuffer = IntBuffer.wrap(bitmapBuffer);
    intBuffer.position(0);
    try {
        GLES20.glReadPixels(x, y, w, h, GLES20.GL_RGBA, GLES20.GL_UNSIGNED_BYTE,
                intBuffer);
        int offset1, offset2;
        for (int i = 0; i < h; i++) {
            offset1 = i * w;
            offset2 = (h - i - 1) * w;
            for (int j = 0; j < w; j++) {
                int texturePixel = bitmapBuffer[offset1 + j];
                int blue = (texturePixel >> 16) & 0xff;
                int red = (texturePixel << 16) & 0x00ff0000;
                int pixel = (texturePixel & 0xff00ff00) | red | blue;
                bitmapSource[offset2 + j] = pixel;
            }
        }
    } catch (GLException e) {
        return null;
    }
    return Bitmap.createBitmap(bitmapSource, w, h, Bitmap.Config.ARGB_8888);
}

![]()

OpenGL基础

基本概念

GLFW: GLFW是一个专门针对OpenGL的C语言库,它提供了一些渲染物体所需的最低限度的接口。它允许用户创建OpenGL上下文、定义窗口参数以及处理用户输入

int main()
{
    glfwInit(); // 初始化
    glfwWindowHint(GLFW_CONTEXT_VERSION_MAJOR, 3); // 设置主版本号和次版本号
    glfwWindowHint(GLFW_CONTEXT_VERSION_MINOR, 3);
    glfwWindowHint(GLFW_OPENGL_PROFILE, GLFW_OPENGL_CORE_PROFILE); // 明确告诉GLFW我们需要使用核心模式意味着我们只能使用OpenGL功能的一个子集(没有我们已不再需要的向后兼容特性)
    //glfwWindowHint(GLFW_OPENGL_FORWARD_COMPAT, GL_TRUE); 如果使用的是Mac OS X系统,你还需要加这行代码到你的初始化代码中这些配置才能起作用

    return 0;
}
while(!glfwWindowShouldClose(window)) 
    // glfwWindowShouldClose函数在我们每次循环的开始前检查一次GLFW是否被要求退出,如果是的话该函数返回true然后渲染循环便结束了,之后为我们就可以关闭应用程序了
{
    glfwSwapBuffers(window);
    // 函数会交换颜色缓冲(它是一个储存着GLFW窗口每一个像素颜色值的大缓冲),它在这一迭代中被用来绘制,并且将会作为输出显示在屏幕上。
    glfwPollEvents();
    // glfwPollEvents函数检查有没有触发什么事件(比如键盘输入、鼠标移动等)、更新窗口状态,并调用对应的回调函数(可以通过回调方法手动设置)
}

GLSL: OpenGL Shading Language

顶点着色器

#version 330 core
layout (location = 0) in vec3 aPos;

void main()
{
    gl_Position = vec4(aPos.x, aPos.y, aPos.z, 1.0);
}

片段着色器

#version 330 core
out vec4 FragColor;

void main()
{
    FragColor = vec4(1.0f, 0.5f, 0.2f, 1.0f);
} 

GLAD: 用来管理OpenGL的函数指针

if (!gladLoadGLLoader((GLADloadproc)glfwGetProcAddress))
{
    std::cout << "Failed to initialize GLAD" << std::endl;
    return -1;
}

ViewPort: OpenGL渲染窗口的尺寸大小,即视口(Viewport)

glViewport(0, 0, 800, 600);

VAO: 顶点数组对象 Vertex Array Object
VBO: 顶点缓冲对象 Vertex Buffer Object

unsigned int VBO;
glGenBuffers(1, &VBO);
glBindBuffer(GL_ARRAY_BUFFER, VBO); // 把新创建的缓冲绑定到GL_ARRAY_BUFFER目标上
glBufferData(GL_ARRAY_BUFFER, sizeof(vertices), vertices, GL_STATIC_DRAW); // 顶点数据复制到缓冲的内存中

EBO: 元素缓冲对象 Element Buffer Object或者索引缓冲对象 Index Buffer Object
NDC: 标准化设备坐标(Normalized Device Coordinates) OpenGL仅当3D坐标在3个轴(x、y和z)上-1.0到1.0的范围内时才处理它

Render PipeLine 渲染管线

  1. 图形渲染管线的第一个部分是顶点着色器(Vertex Shader),它把一个单独的顶点作为输入。顶点着色器主要的目的是把3D坐标转为另一种3D坐标,同时顶点着色器允许我们对顶点属性进行一些基本处理。

  2. 图元装配(Primitive Assembly)阶段将顶点着色器输出的所有顶点作为输入(如果是GL_POINTS,那么就是一个顶点),并所有的点装配成指定图元的形状;本节例子中是一个三角形。

  3. 图元装配阶段的输出会传递给几何着色器(Geometry Shader)。几何着色器把图元形式的一系列顶点的集合作为输入,它可以通过产生新顶点构造出新的(或是其它的)图元来生成其他形状。例子中,它生成了另一个三角形。

  4. 几何着色器的输出会被传入光栅化阶段(Rasterization Stage),这里它会把图元映射为最终屏幕上相应的像素,生成供片段着色器(Fragment Shader)使用的片段(Fragment)。在片段着色器运行之前会执行裁切(Clipping)。裁切会丢弃超出你的视图以外的所有像素,用来提升执行效率。

  5. 片段着色器的主要目的是计算一个像素的最终颜色,这也是所有OpenGL高级效果产生的地方。通常,片段着色器包含3D场景的数据(比如光照、阴影、光的颜色等等),这些数据可以被用来计算最终像素的颜色。

  6. 在所有对应颜色值确定以后,最终的对象将会被传到最后一个阶段,我们叫做Alpha测试和混合(Blending)阶段。这个阶段检测片段的对应的深度(和模板(Stencil))值,用它们来判断这个像素是其它物体的前面还是后面,决定是否应该丢弃。这个阶段也会检查alpha值(alpha值定义了一个物体的透明度)并对物体进行混合(Blend)。所以,即使在片段着色器中计算出来了一个像素输出的颜色,在渲染多个三角形的时候最后的像素颜色也可能完全不同。

GLSL

数据类型

和其他编程语言一样,GLSL有数据类型可以来指定变量的种类。GLSL中包含C等其它语言大部分的默认基础数据类型:int、float、double、uint和bool。GLSL也有两种容器类型,它们会在这个教程中使用很多,分别是向量(Vector)和矩阵(Matrix)

Vector

类型 含义
vecn 包含n个float分量的默认向量
bvecn 包含n个bool分量的向量
uvecn 包含n个unsigned int分量的向量
ivecn 包含n个int分量的向量
dvecn 包含n个double分量的向量
vec2 someVec;
vec4 differentVec = someVec.xyxx;
vec3 anotherVec = differentVec.zyw;
vec4 otherVec = someVec.xxxx + anotherVec.yxzy;
vec2 vect = vec2(0.5, 0.7);
vec4 result = vec4(vect, 0.0, 0.0);
vec4 otherResult = vec4(result.xyz, 1.0);

Uniform

Uniform是一种从CPU中的应用向GPU中的着色器发送数据的方式,但uniform和顶点属性有些不同。首先,uniform是全局的(Global)。全局意味着uniform变量必须在每个着色器程序对象中都是独一无二的,而且它可以被着色器程序的任意着色器在任意阶段访问。第二,无论你把uniform值设置成什么,uniform会一直保存它们的数据,直到它们被重置或更新。

我们可以在一个着色器中添加uniform关键字至类型和变量名前来声明一个GLSL的uniform。从此处开始我们就可以在着色器中使用新声明的uniform了

后缀

后缀 含义
f 函数需要一个float作为它的值
i 函数需要一个int作为它的值
ui 函数需要一个unsigned int作为它的值
3f 函数需要3个float作为它的值
fv 函数需要一个float向量/数组作为它的值
#version 330 core
out vec4 FragColor;

uniform vec4 ourColor; // 在OpenGL程序代码中设定这个变量

void main()
{
    FragColor = ourColor;
}
float timeValue = glfwGetTime();
float greenValue = (sin(timeValue) / 2.0f) + 0.5f;
int vertexColorLocation = glGetUniformLocation(shaderProgram, "ourColor");
glUseProgram(shaderProgram);
glUniform4f(vertexColorLocation, 0.0f, greenValue, 0.0f, 1.0f);
// 通过glfwGetTime()获取运行的秒数。然后使用sin函数让颜色在0.0到1.0之间改变,最后将结果储存到greenValue里

Flutter Web初探

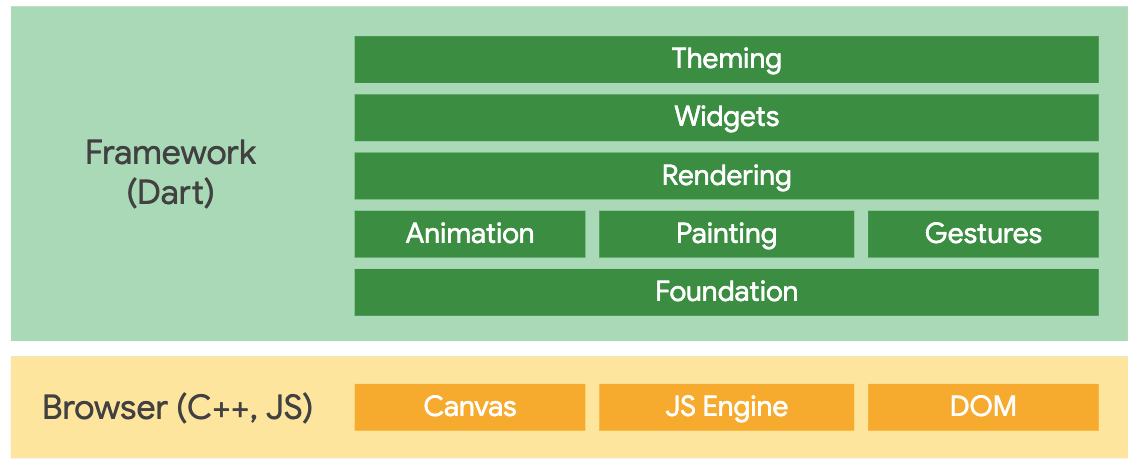
Flutter Web 框架

web

Flutter build && run

1. flutter build web
2. flutter build apk
3. flutter build ios
4. flutter run -d chrome

flutter build web

生成物示例:

│  .last_build_id
│  favicon.png
│  flutter_service_worker.js
│  index.html
│  main.dart.js
│  manifest.json
│  version.json
│
├─assets
│  │  AssetManifest.json
│  │  FontManifest.json
│  │  NOTICES
│  │
│  ├─fonts
│  │      MaterialIcons-Regular.otf
│  │
│  └─packages
│      └─cupertino_icons
│          └─assets
│                  CupertinoIcons.ttf
│
└─icons
        Icon-192.png
        Icon-512.png
        Icon-maskable-192.png
        Icon-maskable-512.png

main.dart.js代码片段示例:

(function dartProgram(){function copyProperties(a,b){var s=Object.keys(a)
for(var r=0;r<s.length;r++){var q=s[r]
b[q]=a[q]}}function mixinProperties(a,b){var s=Object.keys(a)
for(var r=0;r<s.length;r++){var q=s[r]
if(!b.hasOwnProperty(q))b[q]=a[q]}}var z=function(){var s=function(){}
s.prototype={p:{}}
var r=new s()
if(!(r.__proto__&&r.__proto__.p===s.prototype.p))return false
try{if(typeof navigator!="undefined"&&typeof navigator.userAgent=="string"&&navigator.userAgent.indexOf("Chrome/")>=0)return true
if(typeof version=="function"&&version.length==0){var q=version()
if(/^\d+\.\d+\.\d+\.\d+$/.test(q))return true}}catch(p){}return false}()
function setFunctionNamesIfNecessary(a){function t(){};if(typeof t.name=="string")return
for(var s=0;s<a.length;s++){var r=a[s]
var q=Object.keys(r)
for(var p=0;p<q.length;p++){var o=q[p]
var n=r[o]
if(typeof n=="function")n.name=o}}}function inherit(a,b){a.prototype.constructor=a
a.prototype["$i"+a.name]=a
if(b!=null){if(z){a.prototype.__proto__=b.prototype
return}var s=Object.create(b.prototype)
copyProperties(a.prototype,s)
a.prototype=s}}function inheritMany(a,b){for(var s=0;s<b.length;s++)inherit(b[s],a)}function mixin(a,b){mixinProperties(b.prototype,a.prototype)
a.prototype.constructor=a}function lazyOld(a,b,c,d){var s=a
a[b]=s
a[c]=function(){a[c]=function(){H.xF(b)}

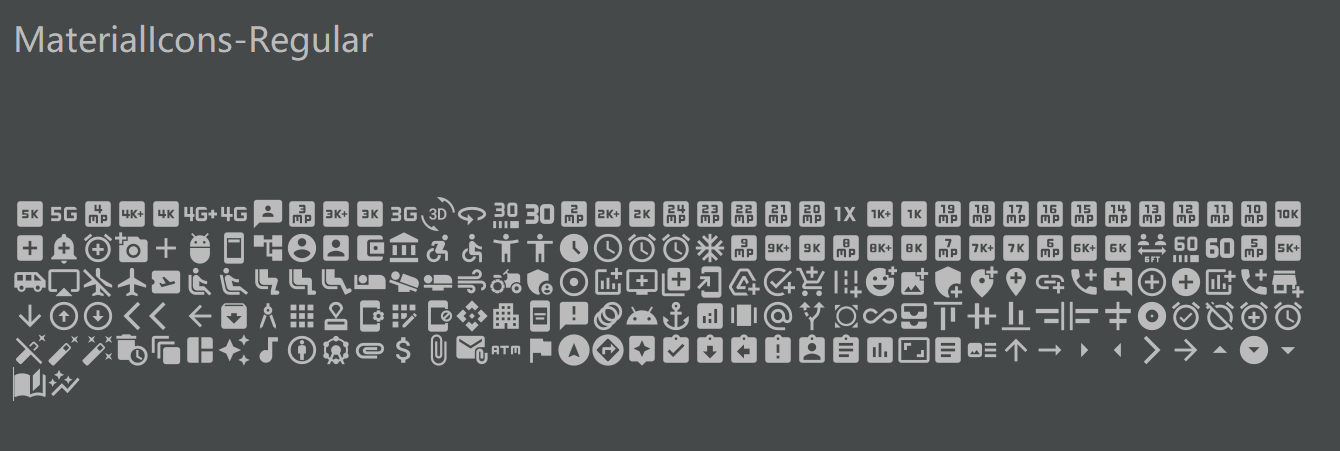
图标资源:

image-20211111165324129

image-20211111165401849

Web Renderer

  1. HTML renderer (default for app)
  2. CanvasKit renderer (default for desktop)
命令行参数

--web-renderer 命令行参数三选一 auto, html, or canvaskit.

  • auto (default)
  • html
  • canvaskit

这个参数可以和 run 或者 build 子命令组合起来. 例如:

flutter run -d chrome --web-renderer html
flutter build web --web-renderer canvaskit

如果没有识别的设备连接,这个参数会被忽略

代码压缩

1. -O(0,1,2,3,4)

dart2js的一个参数,控制代码压缩力度(dartdevc)

-O1产物示例:

// Generated by dart2js (NullSafetyMode.sound, trust primitives, omit checks, lax runtime type, no-legacy-javascript), the Dart to JavaScript compiler version: 2.14.2.
// The code supports the following hooks:
// dartPrint(message):
//    if this function is defined it is called instead of the Dart [print]
//    method.
//
// dartMainRunner(main, args):
//    if this function is defined, the Dart [main] method will not be invoked
//    directly. Instead, a closure that will invoke [main], and its arguments
//    [args] is passed to [dartMainRunner].
//
// dartDeferredLibraryLoader(uri, successCallback, errorCallback, loadId):
//    if this function is defined, it will be called when a deferred library
//    is loaded. It should load and eval the javascript of `uri`, and call
//    successCallback. If it fails to do so, it should call errorCallback with
//    an error. The loadId argument is the deferred import that resulted in
//    this uri being loaded.
//
// dartCallInstrumentation(id, qualifiedName):
//    if this function is defined, it will be called at each entry of a
//    method or constructor. Used only when compiling programs with
//    --experiment-call-instrumentation.
(function dartProgram() {
  function copyProperties(from, to) {
    var keys = Object.keys(from);
    for (var i = 0; i < keys.length; i++) {
      var key = keys[i];
      to[key] = from[key];
    }
  }
  function mixinProperties(from, to) {
    var keys = Object.keys(from);
    for (var i = 0; i < keys.length; i++) {
      var key = keys[i];
      if (!to.hasOwnProperty(key))
        to[key] = from[key];
    }
  }
2. Tree shaking

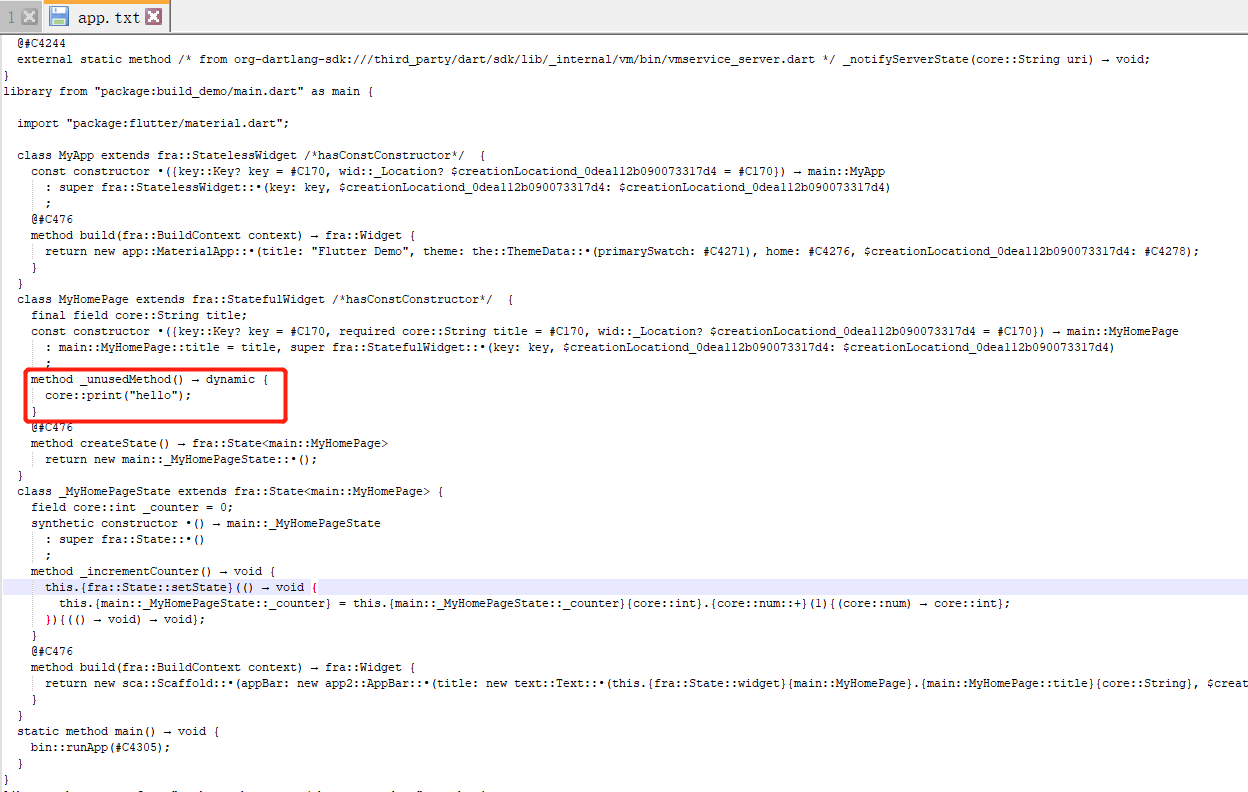
Tree Shaking是一种死代码消除(Dead Code Elimination)技术,这一想法起源于20世纪90年代的LISP。其思想是:一个程序所有可能的执行流程都可以用函数调用的树来表示,这样就可以消除那些从未被调用的函数。

示例:

class MyHomePage extends StatefulWidget {

  _unusedMethod() {  // 没有调用过的函数
    print("hello");
  }

  const MyHomePage({Key? key, required this.title}) : super(key: key);

  // This widget is the home page of your application. It is stateful, meaning
  // that it has a State object (defined below) that contains fields that affect
  // how it looks.

  // This class is the configuration for the state. It holds the values (in this
  // case the title) provided by the parent (in this case the App widget) and
  // used by the build method of the State. Fields in a Widget subclass are
  // always marked "final".

  final String title;

  @override
  State<MyHomePage> createState() => _MyHomePageState();
}
  1. debug
  2. profile
  3. release

image-20211111160045692

image-20211111160352258

Dart2js

lib/src/build_system/web.dart片段

    final ProcessResult javaScriptResult =
        await environment.processManager.run(<String>[
      ...sharedCommandOptions,
      if (dart2jsOptimization != null) '-$dart2jsOptimization' else '-O4',
      if (buildMode == BuildMode.profile) '--no-minify',
      if (csp) '--csp',
      '-o',
      outputJSFile.path,
      environment.buildDir.childFile('app.dill').path, // dartfile
    ]);

中间编译产物(路径在project/.dart_tool/flutter_build/****/

    .filecache
    app.dill
    app.dill.deps
    dart2js.d
    dart2js.stamp
    flutter_assets.d
    gen_localizations.stamp
    main.dart
    main.dart.js
    main.dart.js.deps
    outputs.json
    service_worker.d
    web_entrypoint.stamp
    web_release_bundle.stamp
    web_resources.d
    web_service_worker.stamp

app.dill.depsmain.dart.js.deps分别是app.dillmain.dart.js的依赖项

app.dill.deps片段

file:///C:/Users/chao.bai/AndroidStudioProjects/flutter-demos/for-web/build-demo/build_demo/.dart_tool/flutter_build/27a4a6ceccb8fdc624e4eaa983588bba/main.dart
file:///C:/Users/chao.bai/AndroidStudioProjects/flutter-demos/for-web/build-demo/build_demo/.dart_tool/package_config.json
file:///C:/Users/chao.bai/AndroidStudioProjects/flutter-demos/for-web/build-demo/build_demo/lib/main.dart
file:///C:/src/flutter/.pub-cache/hosted/pub.flutter-io.cn/characters-1.1.0/lib/characters.dart
file:///C:/src/flutter/.pub-cache/hosted/pub.flutter-io.cn/characters-1.1.0/lib/src/characters.dart
file:///C:/src/flutter/.pub-cache/hosted/pub.flutter-io.cn/characters-1.1.0/lib/src/characters_impl.dart
file:///C:/src/flutter/.pub-cache/hosted/pub.flutter-io.cn/characters-1.1.0/lib/src/extensions.dart
file:///C:/src/flutter/.pub-cache/hosted/pub.flutter-io.cn/characters-1.1.0/lib/src/grapheme_clusters/breaks.dart
file:///C:/src/flutter/.pub-cache/hosted/pub.flutter-io.cn/characters-1.1.0/lib/src/grapheme_clusters/constants.dart
file:///C:/src/flutter/.pub-cache/hosted/pub.flutter-io.cn/characters-1.1.0/lib/src/grapheme_clusters/table.dart
file:///C:/src/flutter/.pub-cache/hosted/pub.flutter-io.cn/collection-1.15.0/lib/collection.dart
file:///C:/src/flutter/.pub-cache/hosted/pub.flutter-io.cn/collection-1.15.0/lib/src/algorithms.dart
file:///C:/src/flutter/.pub-cache/hosted/pub.flutter-io.cn/collection-1.15.0/lib/src/canonicalized_map.dart
file:///C:/src/flutter/.pub-cache/hosted/pub.flutter-io.cn/collection-1.15.0/lib/src/combined_wrappers/combined_iterable.dart
file:///C:/src/flutter/.pub-cache/hosted/pub.flutter-io.cn/collection-1.15.0/lib/src/combined_wrappers/combined_iterator.dart
file:///C:/src/flutter/.pub-cache/hosted/pub.flutter-io.cn/collection-1.15.0/lib/src/combined_wrappers/combined_list.dart
file:///C:/src/flutter/.pub-cache/hosted/pub.flutter-io.cn/collection-1.15.0/lib/src/combined_wrappers/combined_map.dart
file:///C:/src/flutter/.pub-cache/hosted/pub.flutter-io.cn/collection-1.15.0/lib/src/comparators.dart
file:///C:/src/flutter/.pub-cache/hosted/pub.flutter-io.cn/collection-1.15.0/lib/src/empty_unmodifiable_set.dart
file:///C:/src/flutter/.pub-cache/hosted/pub.flutter-io.cn/collection-1.15.0/lib/src/equality.dart
file:///C:/src/flutter/.pub-cache/hosted/pub.flutter-io.cn/collection-1.15.0/lib/src/equality_map.dart
file:///C:/src/flutter/.pub-cache/hosted/pub.flutter-io.cn/collection-1.15.0/lib/src/equality_set.dart
file:///C:/src/flutter/.pub-cache/hosted/pub.flutter-io.cn/collection-1.15.0/lib/src/functions.dart
file:///C:/src/flutter/.pub-cache/hosted/pub.flutter-io.cn/collection-1.15.0/lib/src/iterable_extensions.dart
file:///C:/src/flutter/.pub-cache/hosted/pub.flutter-io.cn/collection-1.15.0/lib/src/iterable_zip.dart
file:///C:/src/flutter/.pub-cache/hosted/pub.flutter-io.cn/collection-1.15.0/lib/src/list_extensions.dart

产物比对

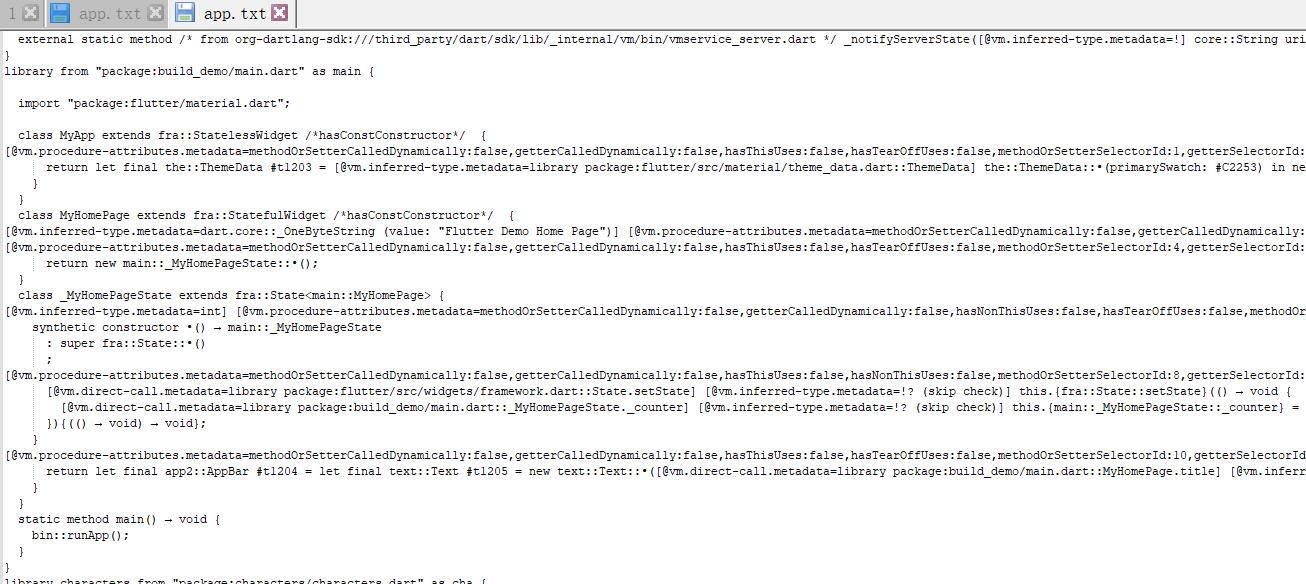
image-20211111162219687

Flutter Native混编

Flutter Native混编调研

0. 背景

由于公司现在有多个移动应用已经在线上运行,比如易销售、智慧仓库等等,虽然Flutter拥有一次编写多端使用的优势,但是推倒用Flutter重新实现一遍代价也比较大,最好的折衷方案是在现有App的基础上进行混合开发编译,在拥有了成熟的Flutter技术沉淀以后可以在新应用上快速接入使用,提升开发效率。

1. 混编接入方式

  1. 在宿主项目中增加ndk支持
android {
  //...
  defaultConfig {
    ndk {
      // Filter for architectures supported by Flutter.
      abiFilters 'armeabi-v7a', 'arm64-v8a', 'x86_64'
    }
  }
}
  1. 添加Java8支持

    android {
     //...
     compileOptions {
       sourceCompatibility 1.8
       targetCompatibility 1.8
     }
    }
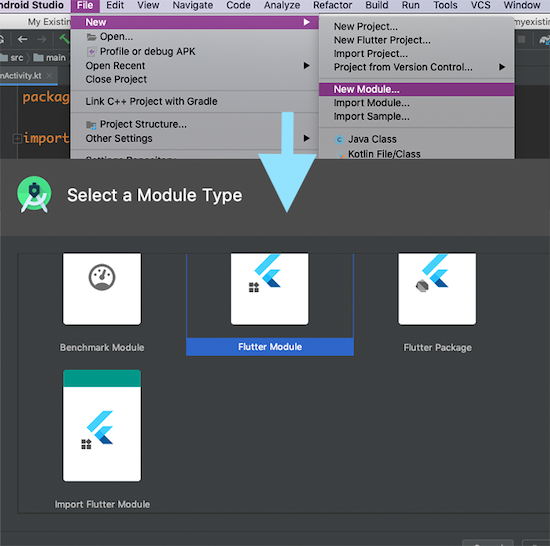
  2. 然后使用Android Studio新建一个Flutter Module项目

img

  1. 在这个Flutter Module项目中进行相关业务开发
  2. 选择以下三种接入方式之一完成混合开发

1. 本地级联编辑

  1. 在宿主项目的setting.gradle中增加本地Flutter Module依赖(假设Flutter Module鱼宿主项目同级)
// Include the host app project.
include ':app'                                    // assumed existing content
setBinding(new Binding([gradle: this]))                                // new
evaluate(new File(                                                     // new
  settingsDir.parentFile,                                              // new
  'my_flutter/.android/include_flutter.groovy'                         // new
))     
  1. 在宿主项目的app中的build.gradle中增加module依赖
dependencies {
  implementation project(':flutter')
}

2. 本地Maven仓库依赖

在Flutter Module中运行

 cd some/path/my_flutter
$ flutter build aar
C:\Users\chao.bai\AndroidStudioProjects\flutter-demos\native-module\flutter_module_pure>flutter build aar
 Building with sound null safety 
Running Gradle task 'assembleAarDebug'...                          12.3s
√ Built build\host\outputs\repo.
Running Gradle task 'assembleAarProfile'...                        29.6s
√ Built build\host\outputs\repo.
Running Gradle task 'assembleAarRelease'...                        30.6s
√ Built build\host\outputs\repo.
Consuming the Module
  1. Open <host>\app\build.gradle
  2. Ensure you have the repositories configured, otherwise add them:
      String storageUrl = System.env.FLUTTER_STORAGE_BASE_URL ?: "https://storage.googleapis.com"
      repositories {
        maven {
            url 'C:\Users\chao.bai\AndroidStudioProjects\flutter-demos\native-module\flutter_module_pure\build\host\outputs\repo'
        }
        maven {
            url "$storageUrl/download.flutter.io"
        }
      }
  3. Make the host app depend on the Flutter module:
    dependencies {
      debugImplementation 'com.fc.mobile.dms.flutter_module_pure:flutter_debug:1.0'
      profileImplementation 'com.fc.mobile.dms.flutter_module_pure:flutter_profile:1.0'
      releaseImplementation 'com.fc.mobile.dms.flutter_module_pure:flutter_release:1.0'
    }

  4. Add the `profile` build type:

    android {
      buildTypes {
        profile {
          initWith debug
        }
      }
    }

这个命令会生成一个本地仓库(初始位置为有your flutter module/build/host/outputs/repo)

build/host/outputs/repo
└── com
    └── example
        └── my_flutter
            ├── flutter_release
            │   ├── 1.0
            │   │   ├── flutter_release-1.0.aar
            │   │   ├── flutter_release-1.0.aar.md5
            │   │   ├── flutter_release-1.0.aar.sha1
            │   │   ├── flutter_release-1.0.pom
            │   │   ├── flutter_release-1.0.pom.md5
            │   │   └── flutter_release-1.0.pom.sha1
            │   ├── maven-metadata.xml
            │   ├── maven-metadata.xml.md5
            │   └── maven-metadata.xml.sha1
            ├── flutter_profile
            │   ├── ...
            └── flutter_debug
                └── ...

为了依赖生成的AAR,宿主项目必须找到这些文件


      String storageUrl = System.env.FLUTTER_STORAGE_BASE_URL ?: "https://storage.googleapis.com"
      repositories {
        maven {
            url 'C:\Users\chao.bai\AndroidStudioProjects\flutter-demos\native-module\flutter_module_pure\build\host\outputs\repo'
        }
        maven {
            url "$storageUrl/download.flutter.io"
        }
      }

    dependencies {
      debugImplementation 'com.fc.mobile.dms.flutter_module_pure:flutter_debug:1.0'
      profileImplementation 'com.fc.mobile.dms.flutter_module_pure:flutter_profile:1.0'
      releaseImplementation 'com.fc.mobile.dms.flutter_module_pure:flutter_release:1.0'
    }

3. 远程Maven仓库依赖

远程仓库依赖可以使用fat-aar三方库将Flutter Module库一起打包生成aar,然后上传至公司maven仓库

2. Native调用Flutter页面

最终我们的目的就是需要在存在的应用上调起Flutter页面,一套代码跨端使用

  1. 对于Android应用,需要在宿主的清单文件中进行注册
<activity
  android:name="io.flutter.embedding.android.FlutterActivity"
  android:theme="@style/LaunchTheme"
  android:configChanges="orientation|keyboardHidden|keyboard|screenSize|locale|layoutDirection|fontScale|screenLayout|density|uiMode"
  android:hardwareAccelerated="true"
  android:windowSoftInputMode="adjustResize"
  />
  1. 在Application中初始化Flutter引擎

       // 实例化
       flutterEngine = new FlutterEngine(this);
    
       // 引擎预热,这么做可以在初次调用Flutter时有更快的相应速度
       flutterEngine.getDartExecutor().executeDartEntrypoint(
         DartEntrypoint.createDefault()
       );
    
       // 根据id缓存对应的引擎
       FlutterEngineCache
         .getInstance()
         .put("my_engine_id", flutterEngine);
  2. 启动页面

    这里使用Activity最为例子,Fragment以及View粒度的实现这里暂不做介绍

myButton.setOnClickListener(new OnClickListener() {
  @Override
  public void onClick(View v) {
    startActivity(
      FlutterActivity.createDefaultIntent(currentActivity)
    );
  }
});